In April 1972, Apollo 16 astronauts set up a television camera near their lunar module (LM). The camera, called the big eye slowly panned back and forth (in a 350 degree arc) to record the astronauts' extra vehicular activities.
Best I can tell the following is a description of the big eye camera. [This may not be right. See the audio log segment that comes next.]
Lunar Surface TV Camera. The RCA television camera (LM4) used on the lunar surface could be operated from three different positions -- mounted on the LM modularized equipment storage assembly (MESA), mounted on a tripod and connected to the LM by a cable, and installed on the LRV with signal transmission through the lunar communication relay unit. While on the LRV, the camera was mounted on the ground-controlled television assembly. The camera could be aimed and controlled by the astronauts or remotely controlled by personnel in the mission control center. Color was achieved by using a rotating disc driven by a 600-rpm motor. Lunar color scenes were scanned, filed sequentially, and down-linked serially to the Manned Space Flight Network. Video was received and recorded from lunar distance at any of the three Deep Space Stations. Source: Apollo 16 Photography [Added 11 Aug 2018.]
120:06:51 Duke: Hey, you're looking at me with the big eye!
120:06:53 England: Right. The big eye's on you, Charlie.
120:06:57 Young: (They're) trying to see if you're nervous, Charlie. (Pause)
120:07:10 Duke: Can't just throw those bags over there like I used to (in training); they bounce into the dirt.
120:07:14 Young: Yeah. (Pause)
...
120:07:19 Duke: How's the (TV) picture, Tony?
120:07:21 England: Very good picture. (Pause) Beautiful; outstanding color.
120:11:02 Duke: Okay, the Sun compass goes under your seat, (straining
as he reaches across) map's going over in mine. (Pause) And here comes the
big eye, the 500.
. . .
[The "500" is a Hasselblad camera equipped with a 500-mm lens.]
. . .
See Apollo Lunar
surface Journal
Each time big eye's field of view passed through what appeared to be a southerly direction there was a faint hazy irregular shaped something located a few degrees above the horizon. The following marked up picture shows the lunar lander, in situ, as well as a drawn-in likeness of the Faint Hazy Object (FHO) and the big eye camera.
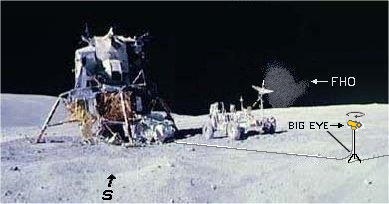
Apollo 16 Lunar Lander Showing a Likeness of the Faint Hazy Object
When I first saw the faint hazy object I went, "Oh Man! Somebody has hit another golf ball (like back on Apollo 14) and has blasted up a dust cloud that hasn't settled out yet." But... when big eye came back about a minute later, the dust cloud had not settled. Nor did it ever, even after several inspections by big eye. I dispensed with the golf ball scenario.
I rejected camera artifact because that should show some degree of sliding around with respect to other objects in big eye's field of view. The hazy object was photographically rock solid.
That left me with at least two other options.
(1) The hazy object was astronomical in nature. (For example, a messier object.)
(2) The astronauts were actually being televised on earth. If so, then the hazy object could be the result of somebody running short of flat-black paint or perhaps there was some specular reflection of a stage lighting source.
Over the years since the Apollo missions I have come to entertain option (2). No final decision on my part has been made.
Initially I chose option (1). What follows hinges on that proposition.
So what hazy astronomical body is South of the moon? Where large distances are involved, this question can be restated with respect to the Earth. (That is not exactly true.)
I broke out Menzel's A Field Guide to the Stars and Planets and pored over its polar map of the southern celestial hemisphere. The best I could come up with at the time, was one of the Magellanic clouds. (These are roughly 17 and 21 degrees away from the Earth's south celestial pole.)
The plane of the ecliptic is tilted 23.5 degrees (deg) with respect to earth's celestial equator. The ecliptic north pole is at 18 hrs RA, +66.5 deg Dec, and the ecliptic south pole is at 6 hrs RA, -66.5 deg Dec. [Thanks to Joe Harrington for calling attention to a coordinates mistake and for clearing up some polar nomenclature.]
Most sources indicate that, the moon's orbit is tilted some five degrees with respect to the ecliptic. Thus, if you draw a five-degree-radius circle around the ecliptic south pole then the lunar south celestial pole should be somewhere on that circle. (See the larger red circle on the drawing below.)
According to a 1988 University of Texas at Austin source (Page 12.) the moon's celestial axis is inclined to the pole of the ecliptic 1.5 degrees. (This would correspond to a location somewhere on the smaller red circle below.) [Added 09 Mar 2009.]
Southern Lunar Horizon and Approximate Location of Lunar South
Celestial Pole as seen from Apollo 16 landing site on 23 April 1972.
[Added 23 September 2005. Replaced 17 Mar 2009.]
WordIQ.com [Link has changed.] says that the lunar axis is tilted with respect to the normal [of its orbital plane?] by 1.54 degrees, and the coordinates for the lunar Northern Celestial Pole are RA 17 hours 47 min, Dec 65.46 deg. This would make the coordinates for its South Celestial Pole, to be RA 5 hours 47 min, Dec -65.46 deg. (These coordinates may be for a specified time.) The position associated with these coordinates is shown as a red dot which overlaps delta Dorado on the diagram above. The Distant Southern Lunar Horizon would have been nine degrees below that position.
On April 23, 1972 an observer located at the Apollo 16 landing site, facing South, should have seen the center of the Large Magellanic Cloud at about 12 degrees above the distant southern lunar horizon. (My memory from the Big Eye panorama places it at about four degrees above the local horizon. The approximated local southern horizon in the drawing has been shifted upwards to make the geometry come out right.
Equatorial - RA 05 hrs 23.6 min, Dec -69 deg 45 min
Galactic - LII 280.4136 deg, BII -32.9310 deg
In 2002 I purchased a NASA book and video covering the Apollo 16 mission, but failed to see the hazy object anywhere in the video. Best I can tell, the focus clarity of the Big Eye mission video is degraded from that which was broadcast during the 1972 coverage.
Barring evidence to the contrary, and if I haven't stretched things too far, it would seem that my Faint Hazy Object was the Large Magellanic Cloud.
Back to 1972.
Then I noted that the Milky Way, as projected on the polar plot, formed a long curved arc. Aesthetically, it looked nice but then I got "bent out of shape" at the celestial plot because the Milky Way is not bent out of shape. The distortion is even worse when you look at the Milky Way on a celestial equatorial projection (where the celestial equator is the undistorted aspect). You might want to stay home!
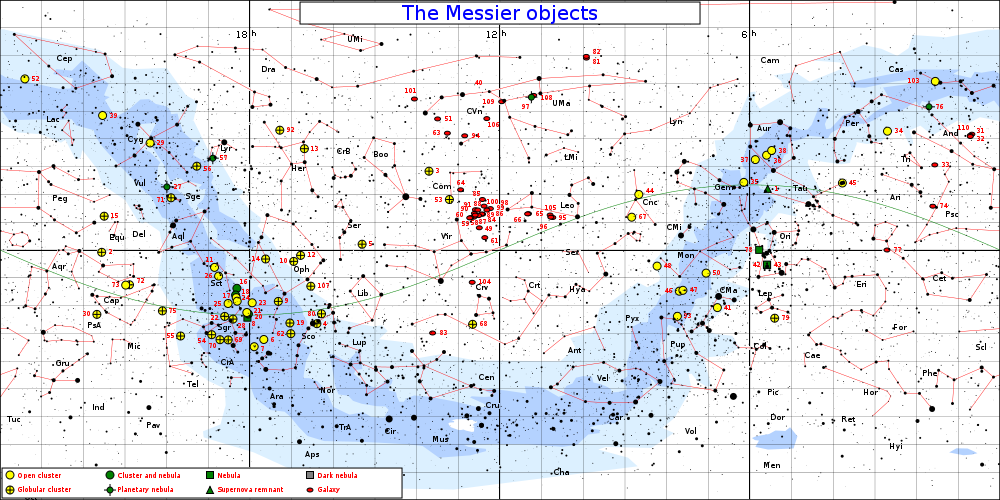
Here is an equatorial chart showing Messier objects and the Milky Way distortion. [Installed 26 Aug 2011.]